Tuesday, November 26, 2013

Cooking Light


Cooking Light is the first assignment in the Lighting 102 course.  The assignment is to take a photo of a kitchen utensil.  While this sounds pretty straightforward to walk into your kitchen and snap a photo of a fork, the goal is to elevate this kitchen utensil into art. 

Helpful Hint:  I typically keep my white balance setting to Auto.  This habit stems from a bad experience I had when taking photos of out-of-state family with a wrong white balance set.  At that time I shot in jpeg, which made correcting those photos difficult and since they were out-of-state I couldn’t re-shoot them easily.  I now usually shoot in RAW so I have complete control of all of my camera’s internal settings on my computer without degrading the image.  This means that I can fiddle with the white balance, the picture style, etc. on my computer later and concentrate on composition, focus control, exposure, etc. during the shoot.  There's nothing worse than finding out that you turned grandma green because you were using the wrong white balance. 

The Auto White Balance setting on my camera typically does a good job of judging the correct white balance.  That was until this shoot.  The external flashes that I use are third party and manual (not TTL*) flashes.  I love them but my camera doesn’t “see” them as external flashes.  This isn’t really that big of a deal but it does mean that my Auto White Balance setting is inaccurate when using these them.  I was saved again in this assignment by shooting in RAW because of course I didn’t realize this until I was looking at the photos on my computer.  It turned a potential headache into a simple fix.

*TTL (through-the-lens) – without being too technical this is a metering method that uses the camera’s internal “brains” to determine how powerful the flash should fire.  It’s a nice feature to have but I think it would actually handicap my learning of flash photography since the camera would be selecting the power setting of the flash instead of my brain.

The big draw back to shooting in RAW is that the files are huge.  They will take up a lot more room on your camera’s memory card and on your computer’s hard drive.  Another draw back is that you need to post-process them into jpeg’s.  RAW files are, well raw; they need to be “polished”.   Your camera automatically does this when you shoot in jpeg, but when you shoot in RAW you need to do this yourself.  My camera came with software to do this but Photoshop, Lightroom, and others can do it as well.

In this assignment I was challenged to utilize the controls that I have learned so far to produce a final product that could, for example, be found in a catalog or hanging in a restaurant.  I wanted to select something that said something about who I am, so at first I selected a chef’s knife.  I like to cook so I thought by using it I could get some inspiration.  Unfortunately, the knife wasn’t giving me the amount of inspiration I needed.  True inspiration comes from things that I love.  I like cooking but I certainly don’t love cooking.  I do however love wine and I found my inspiration with a corkscrew. 

I did want to show one of the photos I took of the knife to reinforce the idea that specular highlights define dark objects.  Take note of the knife handle, there is a specular highlight that runs down the length of it that defines its 3-dimensional shape.  Without this specular highlight the handle would just be black.  In my last post I wrote about the difference in light and dark toned objects and hopefully this example drives home this concept.


 It took me a long time to realize that to get the photo to really come together I needed to control the specular highlight by reflecting the light off the subject directly into the camera lens.  Once I realized this I saw a huge improvement in my photos.  

I found that keeping my key light as close to the camera as possible with the umbrella allowed me to more easily determine where the camera needed to be to capture the reflected light.  I also had second light to the right just to take out the shadow caused by the key light.

I don’t know if this photo would be considered “high art” but I was really happy with my results.  I never would have thought about trying to take an artful photo of one of my kitchen utensils and this is one of the reasons that I began the L102 course.  The course gets me out of my comfort zone and gives me a reason to take photos of different things using new techniques.  I find that practical experience is the best way for me to learn.  I compare it to learning how to drive a car.  A person can read all the manuals there are but they can’t really learn how to do it without getting behind the wheel.

The second assignment in the L102 course is up next and we are going back to live subjects.  First step, finding my next victim!

Sunday, November 17, 2013

Headshots Review


My previous two posts described my progress through Lighting 102 lessons on Strobist.com two ways to control a light source, position and apparent light size.  These controls had a major impact on the end result of the Lighting Boot Camp assignment on Headshots.

In an earlier post, I admitted to you that I was blindly plodding my way through the Headshots assignment.  Now that I understand position and apparent light size better I wanted to go back to this shoot and explain in more detail how this shot was created and how these controls affected the end result.

I’ll begin with apparent light size.  In the last lesson I learned that the apparent size of our light source affects how large the transition is between highlight and shadow. To produce soft light an apparently large light source is required.  Soft light extends the transition between highlight and shadow.  In contrast, apparently small light sources produce hard light and reduce the transition between highlight and shadow.

In my headshot shoot I used a combination of hard and soft light sources.  I wanted my main light to be soft so I used a shoot-through umbrella positioned slightly higher than the model’s head on the camera left side.  This position creates shadows under the model’s nose and chin.  These shadows add dimension to the model’s face but by utilizing an apparently large light these shadows are softened.  
I envisioned my second light source being natural light coming through a nearby widow camera right.  It was partly cloudy the day of the shoot, so my light source kept going in and out.  Instead of dealing with nature I set up a second speedlite in front of the window.   I left this speedlite bare, making its apparent size small.  This produced hard light and you can see the transition between highlight and shadow on the left side of the models face is really small.  


By modifying the apparent size of either of the light sources the transition between the shadows and highlight can be changed.

Distance also affects the apparent size of a light source.  This shot was taken in a relatively small room.  Adding or removing an umbrella was more effective in modifying the size of the light source than altering the distance between the subject and the light source.  However, the distance of the light source did have a major effect on the exposure of the background.  If I wanted to darken the background without repainting the wall I could have moved the umbrella light closer to the model and taken advantage of the flash’s depth of field. 

Don’t forget about the Specular Highlight.  A specular highlight is light reflecting directly off an object into your camera.  Even though it seems that the human face is not a reflective surface, it is, and specular highlight does come into play.  The 3-dimensional attributes of light toned objects are defined by shadows and dark toned objects are 3-dimensionally defined by specular highlight.  This has a major impact when dealing with subjects with different skin tones.  In this shot, the models skin tone is fairly light so the shadows are giving the photo a 3-dimensional look.   

Regardless of the model’s skin tone specular highlights also show up in the models eyes.  These specular highlights in the eyes are called catch lights.  Catch lights make a photo look more natural.  You can typically tell the shape of the light source by looking at the shape of the catch light in the subject eye.  The shoot-through umbrella used in this shot creates the round catch light.  If a rectangular softbox was used the catch light would be rectangular instead of round.

As a general rule of thumb (insert Boondock Saints opening scene), the shape of a catch light should mimic a natural catch light.  For instance, for an indoor photo the light source creating a catch light could be a window creating a rectangular catch light so creating one with a rectangular softbox would be appropriate.  For an outdoor photo creating a rectangular catch light wouldn’t match a natural round catch light caused by the sun.  I’m not saying that softboxes shouldn’t be used in outdoor photography; professional photographers used softboxes outdoors all the time.  I just want you to be aware of the shape of the catch lights that you create.  This might not seem like a big deal, but gaining an understanding of this can help you determine if the shape of the specular highlight is important in your own photography. 

Another neat thing that I learned from Strobist.com is that you can further alter your light modifier by blacking out a portion of it.  A logo, design or even wording can be added to a light modifier and it will show up in the specular highlight.  I haven’t personally tried this yet but when my new softbox comes in I might.  I’ll let you know how it turns out in a future post.

The subject of my next post will be the L102 Cooking Light assignment.  When I was working on the cooking light shoot I thought back to how these controls affected my headshots assignment.  It was important and helpful for me to relate my newfound knowledge to my previous work and I wanted to share it with you.  I hope that this helps you further understand the position and apparent light size controls.

For more on specular highlights and working with skin tones check out Lighting 102: Unit 2.2: http://strobist.blogspot.com/2007/07/lighting-102-unit-22-specular-highlight.html

Saturday, November 9, 2013

2 - Apparent Light Size


In last week’s post I discussed my progress through the Strobist.com L102 lesson on position.  This is the first of seven ways to control light.  The takeaways from this lesson were:
  1. By altering the angle of our light source we can control how highlights/shadows are cast upon a subject.
  2. By altering the distance ratio between our subject and the flash versus the background and the flash we can control the exposure of the subject and the background independently.
This week I’ll be discussing Strobist.com’s second way to control light apparent light size.  This lesson begins with an exercise that illustrates the effects of altering the apparent size of a light source and then gets into a discussion on Specular Highlight Control.  Hopefully by the end of this post that last term won’t sound so foreign and complicated.

The first exercise instructs readers to take a series of photographs while changing the apparent size of a light source.  Please note that there is a major difference between simply the size of the light source and the apparent (or relative) size of the source.  When thinking about the apparent size you need to think about the size of the light source from the subject’s point of view.  Ask yourself how the subject sees your light source. 

For instance, a speedlite might look huge to a matchbox car, if it’s close enough, but tiny to a full-size sedan.   To get the same effect on a full-size sedan as the matchbox car, you just need to use a light source that is slightly larger than the car.  Sounds easy, right?  In my Headshots post I discussed bouncing a flash off a wall or ceiling.  Instead of using a car sized flash you could use a room sized ceiling to bounce a small flash off of.  By bouncing the flash off a ceiling the car would see the entire ceiling as the light source.  Other ways to modify the size of a light source include umbrellas, softboxes, reflectors or any number of things.  When using these, the subject is no longer seeing the relatively small speedlite as the light source but the entire modifier as the light source. 


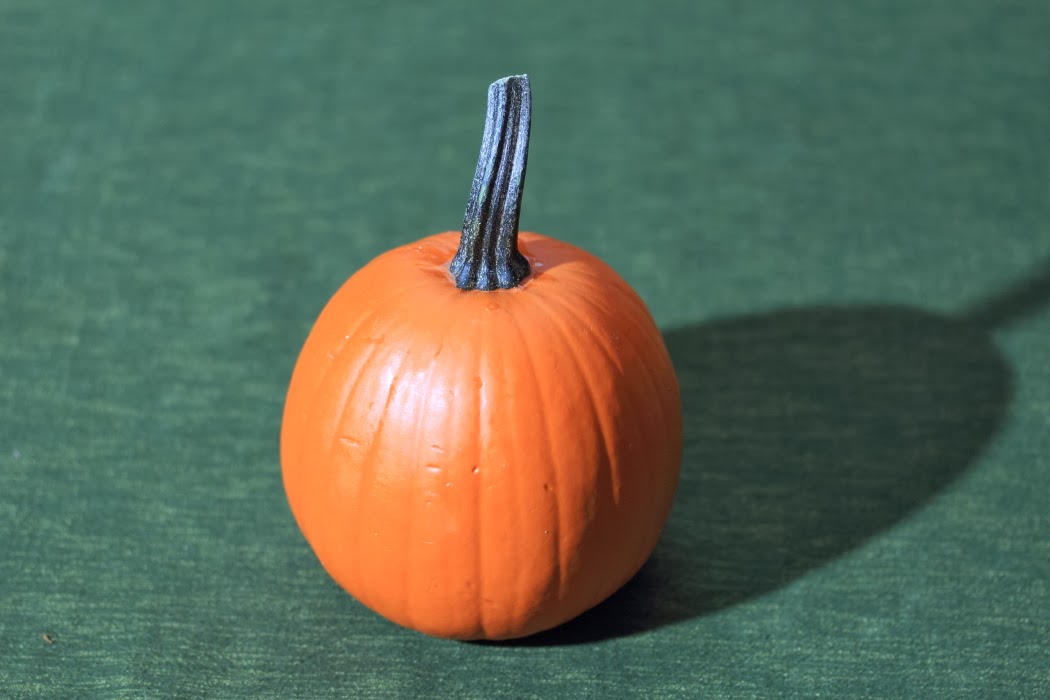
Using a bare speedlite
Using a shoot-through umbrella
To the right are two photos using a pumpkin as the subject.  In these photos the distance of the light source was constant.  I shot with a bare flash in the first shot and then modified the flash with a shoot-through umbrella in the second.  Notice any difference?  

The bare flash in the first shot was an apparently small light source that creates a harsh shadow.  This is referred to as hard light.  The umbrella used in the second shot diffused the light over its entire surface making the area between highlight and shadow much larger.  This, photographers refer to as soft light.   It’s important to remember that whether a light is hard or soft has nothing to do with how powerful the light is but rather the apparent size of the light source.

The apparent size of a light source also depends largely on distance.  In the last example I kept the distance between the pumpkin and the flash constant.  Now try to visualize what would happen if I used that same shoot-through umbrella but instead of being two feet away from the pumpkin the umbrella was, say fifteen feet away.  Would the umbrella still be an apparently large light source? 

To help answer this question, think of the largest light source you can think of, the sun for instance.  We know from elementary school that the sun is incredibly large (and powerful), but on a clear sunny day it casts harsh shadows.  How can this possibly be!?  It’s because the sun is also incredibly far away.  This principal is the same for your speedlite, the farther away it is the smaller it is, and the more powerful it needs to be.  Now on a cloudy day you get much better shadows.  This is because the clouds are diffusing the sunlight making the entire sky your light source.  You can think of a cloudy sky as giant shoot-through umbrella.  This diffused sunlight also improves color saturation.  So go out and have fun when the sun is shining, but when the clouds roll in, go grab your camera.

Up close the umbrella makes a huge impact compared to the bare flash.  When that umbrella is moved out to a much greater distance the umbrella doesn’t make the light source apparently much larger.  It’s really just robbing power out of your flash so at a large distance you might think of ditching the umbrella.

As part of this exercise, Strobist.com instructed us to use a fruit, of our choosing, to be the subject of this exercise.  I typically work through these exercises a week or two before my post discussing them is published.   This means that even though this post is published in November, I was working through the exercises in late October so I felt using a pumpkin was fitting.  I realize I failed to follow one of the easiest instructions of the exercise by choosing a pumpkin as my subject but it just seemed right at the time.  I also learned this week that a pumpkin, believe it or not, is a fruit.  Now I feel like I’m just making shit stuff up.  I also no longer think I have a clue as to what a vegetable is.

Most speedlites also have a zoom function, so I wanted to debunk a misconception that you might have on how this effects the apparent size of the speedlite.  Let me show you an example of how this works.

Flash at 24mm zoom
Flash at 105mm zoom - no change to apparent size
The zoom function on your flash focuses the flash to light only what it needs to.  At a small focal length you need to spread that light out to cover your entire frame, if that’s what you’re looking for.  At a larger focal length you only need to light the smaller area that is inside your frame.  This allows you to waste less light outside your frame.  The zoom function on your speedlite might be expressed in mm.  This roughly corresponds to your lens’ focal length, if that flash was mounted on your camera, to illuminate the entire frame.  In this first photo my speedlite is zoomed all the way out to 24mm.  In the second photo I zoomed the flash all the way in to 105mm.  Notice any difference in the highlight or the shadow?  

There isn’t much because the zoom function of the flash does nothing to the apparent size of the flash.   At 105mm I’m wasting much less light outside the frame so I need less lighting power but the size of the light source remains constant.  You can see that the second photo is slightly brighter over all because of this.  Please ask questions in the comments section below if this explanation has left you confused. 


Now let's get into Specular Highlight Control.  This is a pretty scary term, at least it was to me, but hopefully it won’t be once we are done.  A specular highlight is the light reflecting directly off an object into your camera. Look again at the last shot of the pumpkin.  That reflection of the light off the left side of the pumpkin is the specular highlight.  You can control the specular highlight by the position of the light source and/or by modifying the shape and size of the light source by using an umbrella, softbox, etc.  To illustrate this control I used a billiard ball.  It is highly reflective so it is easy to see changes to the specular highlight. 

Bare speedlite
In the first shot I used a bare flash and you can see that small light source reflecting off the ball.  I modified the light source in the second shot by using a shoot-through umbrella.  You can clearly see the reflection of the umbrella on the billiard ball.  These are specular highlights.  These highlights can be modified by modifying a light source.

Shoot-through umbrella
You can also notice a second reflection on the top of the ball in both of these shots.  This specular highlight is caused by a second flash bouncing off of the ceiling.  You can add as many specular highlights as you wish. You are only limited by how many light sources you have available.  You can also click on these photos to see them full size.  If you do, you can also see a third specular highlight on the back left side.  This one is caused by a tungsten lamp behind and to the left of the ball.

That’s it, that’s the specular highlight and a couple ways to modify it.  It’s not so scary now, is it?  

To play around with this more I took a third shot of the billiard ball.


Can you tell what the light source is, how many there are, and what I’m using to modify them?  Instead of just telling you the answers straight away I’d like you to take another look at the photo and let me know what you think the answers are in the comments section below.  Reverse engineering how other photographer’s photos were made will help you when you’re planning your own shoots.  I’ll let you know in my next post how this shot was created.

There are two upcoming assignments in the L102 coursework.  The Position and Apparent Light Size lessons include exercises that illustrate these controls.  The exercises are not designed to create great photos to hang on a wall. They are designed to allow you to play around and learn the controls in a practical way.  Assignments are focused on refining your skills to produce a finished product.   In my next post I’ll be discussing my progress through the Cooking Light and Umbrella Specular assignments.  You can preview these assignments on strobist.com, here, for a sneak peek at the goals of these assignments.

Until then, try these exercises out for yourself and continue having fun with your camera.  I’m always excited when I finish a blog post because it means that I can go shooting again!  Don’t forget to add any questions you have in the comments section and let me know how you think I created the last photo of the billiard ball.